
.png)
I am super excited about this months silhouette challenge project. This months theme is SPRING and I am so ready for spring to come and stick around for awhile. I really love how my spring sign turned out and I am also stoked to say that it is for me. LOL Most of the projects I make are for others....and I love that too....but it is nice that this little work of art is outside my front door greeting everyone who enters.
My post is a bit long(sorry...I wanted to do a video tutorial but my camera was not cooperating ;( ).....but if you stick around to the end you will find links to more crafty inspiration from all of the other challenge participants. You have to check out these ladies blogs.....they are creating some amazing projects!
For my project I was inspired by this post on pinterest:

Materials used:
Bike wheel (rubber and pin from center removed)
Wooden triangles (I picked these up at Michael's)
Washi Paper
Twine
Vinyl
Shrink Plastic (I used the Clear version)
Piercing tool (I used a pointy sanding tool)
Alcohol based ink (I used sharpies)
Heat tool
Tweezers
Beads of various sizes
Head Pins
Wire pliers
Strong Adhesive (I used E-6000)
Glue Dots
Spray Sealant
The first thing I did was head out to the shed. I was on a mission to find a tire that would work. We had a tiny little bike that my kids are too big for and it was a little bent out of shape anyhow....just waiting for a project like this to come along.
(We have probably a dozen bikes between our shed and my in-laws shed that my kids have outgrown....I think I need to make a few more of these)
I had hubby remove the pin from the center of the bike (I tried...really I did...but couldn't figure it out. Of course he had it pulled in no time!
I cleaned it up a little but of course; it is a bit rusty....but that just ads to the rustic look of it. LOVE
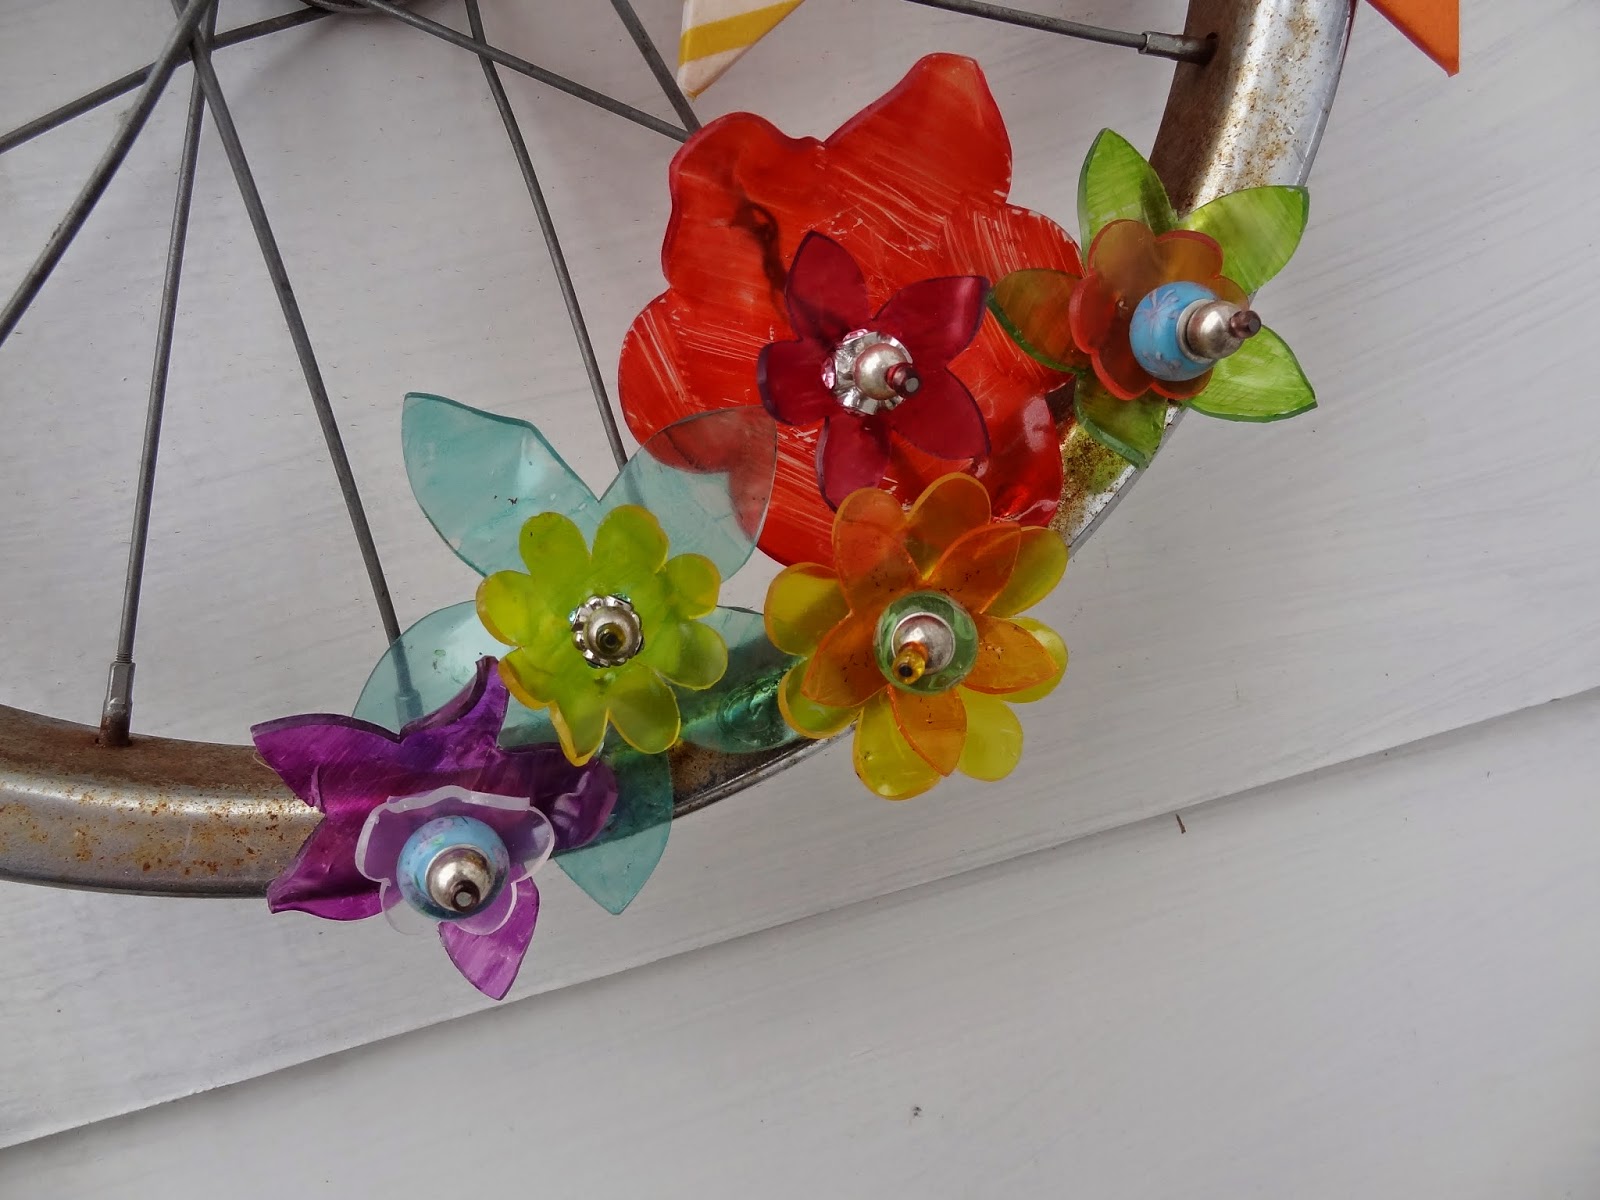
The next step was super fun! The flowers.
Guess what....I got my cameo to cut through the clear shrinky dink plastic like BUTTA!!!!!
Here's how:

Here is a link to the flowers I cut out (I did design this in the new DE Update )
Each page I cut is color coded so when you go to cut....select which "color/page" you would like to cut.
Select Stencil for the type of material
Change settings to:
Blade - 10
Speed - 2
Thickness - 22
Double Cut (3 times)
(So....you have cut it 6 times)
(So....you have cut it 6 times)

Look....I didn't have to use my scissors or anythig! It pulled right off like butta.....BUTTA I TELL YA!!!!!!
OK.....I will settle down and finish ;)


NOTE: After cutting out many of these on an old mat I noticed that I did cut through my mat with the last one I cut (for the photo op below ;) - just one partial petal cut through. (I think a little packaging tape on the back side will make for a good patch up job....I can get a little more life out of her!) I don't recommend cutting tons of these as I am pretty sure it will dull your blade quickly and the potential of cutting through your mat is there....but for a special project....GO FOR IT!
(UPDATE: I ADDED CENTER HOLES TO ALL THE FLOWERS IN THE CUT FILE)

Using alcohol based ink, color in your flowers. The color will intensify when you shrink the flowers. If you want to end up with a lighter colored flower....color it with an even lighter (almost opaque)shade.


Get ready.....this is so fun! Get your heat tool ready and watch the magic happen. Don't worry....it looks like your flower shrivels up and becomes deformed....keep heating it until the petals open back up. Once you turn your heat tool off; work quickly to position the leaves to make it look more realistic and not flat and boring (I guess it depends on the project you are going to use them on).
Next you will need some beads and the head pins. ( I am not a beader and wasn't sure what these were at first...but I hit up Walmart and found a cute set of springy beads and a small package of head pins in the craft/beading section)

Thread a few fun beads on the head pin, add a smaller flower and then a larger one.

Using your pliers make a loop and twist it around a few times.

You can bend the head pin a little to position the flowers center however you like.


I LOVE LOVE LOVE how these flowers turned out!
The banner:
I found some wooden triangles at M's and I covered them with some washi paper. Simple enough! Threaded some twine through it...knotted the ends....and added some vinyl I cut out using the same file (linked above).
I attached the banner with glue dots.
I adhered the flowers with some E-6000.
Then I sprayed the whole thing with some indoor/outdoor spray sealant (front and back).
(I probably should have sprayed the banner prior to attaching it to the wheel....but it worked.)
And here we are......my new Spring welcome sign.


Want to Check Out More Silhouette Projects?
Sit back, relax, and get ready to be inspired! Below you will find links to more amazing and fabulous "SPRING" inspirational projects all of my Silhouette Challenge friends are sharing on our blogs today. Remember to stop and leave them some love....your comments feed our creativity and fill our love buckets. ❤
1. Dream a Little Bigger // 2. So Much Better With Age // 3. Adventures in All Things Food // 4. Creative Carnival // 5. The Kim Six Fix // 6. feto soap // 7. One Dog Woof // 8. The Experimental Home // 9. From Wine to Whine // 10. Architecture of a Mom // 11. Grey Luster Girl // 12. Minted Strawberry // 13. Designed Decor // 14. Tried & True // 15. Silhouette School // 16. Bringing Creativity 2 Life // 17. Weekend Craft // 18. Practically Functional // 19. Please Excuse My Craftermath... // 20. McCall Manor // 21. unOriginal Mom // 22. Creative Ramblings // 23. A Tossed Salad Life // 24. A Glimpse Into Barb's Life // 25. Kate's Paper Creations // 26. Simply Kelly Designs // 27. Cutesy Crafts // 28. Persia Lou // 29. Whats Next Ma // 30. Two Purple Couches // 31. The Frill of Life // 32. Nearly Handmade // 33. Get Silvered // 34. Ginger Snap Crafts // 35. Life After Laundry // 36. The Sensory Emporium // 37. Monograms & Cake // 38. The Thinking Closet // 39. My Paper Craze // 40. Chicken Scratch NY
Oh my goodness! This is beyond cute!! And I am in love with those Shrinky Dink flowers!! Awesome job!!
ReplyDeleteThank you Emily. I really love the way the flowers turned out. So fun!
DeleteI am super excited to know that we can use the silhouettes for shrinky dinks!! Love the project--so cute!
ReplyDeleteThank you Rachel! I love me some shrinky dinks! Just too fun watching them shrink like magic.
DeleteUm... these are *ah-maz-ing*!!! I want to make little earrings like this now. :D
ReplyDeleteAwe...thank you. I would love to see the earrings you create!
DeleteThis is just awesome. I have a few salvaged bike wheels that I was planning on using on projects but hadn't even thought of a wreath. Thanks for sharing the Shrinky dink cut settings too!
ReplyDeleteI love how the bike wheel turned out. I will definitely being doing more of these in the future.
DeleteThis is too cute! Finally Shrinky Dink! I have heard so much about it but had no real idea what it was! Loving this whole project!
ReplyDeleteMichelle you have to get your hands on shrinky dinks! They are so much fun!
DeleteI know I have some shrinky-dink material kicking around somewhere in my craft room! Thanks for sharing your cut settings! I will have to give this a try!
ReplyDeleteWell...when it pops up you will know what to do with it now. Dig it out and play......the magical shrinking is kind of addicting. LOL
DeleteI have never used the shrink plastic before but I always love finding new materials to cut with my Silhouette! Thanks for the inspiration!
ReplyDeleteLove it! Really! Love love it!
ReplyDeleteI every time spent my half an hour to read this weblog's posts daily along with a cup of coffee. 경마
ReplyDelete
ReplyDeletehttps://www.gladwingroup.com/interactive-led-flat-panel-display-supreme-9-series.php